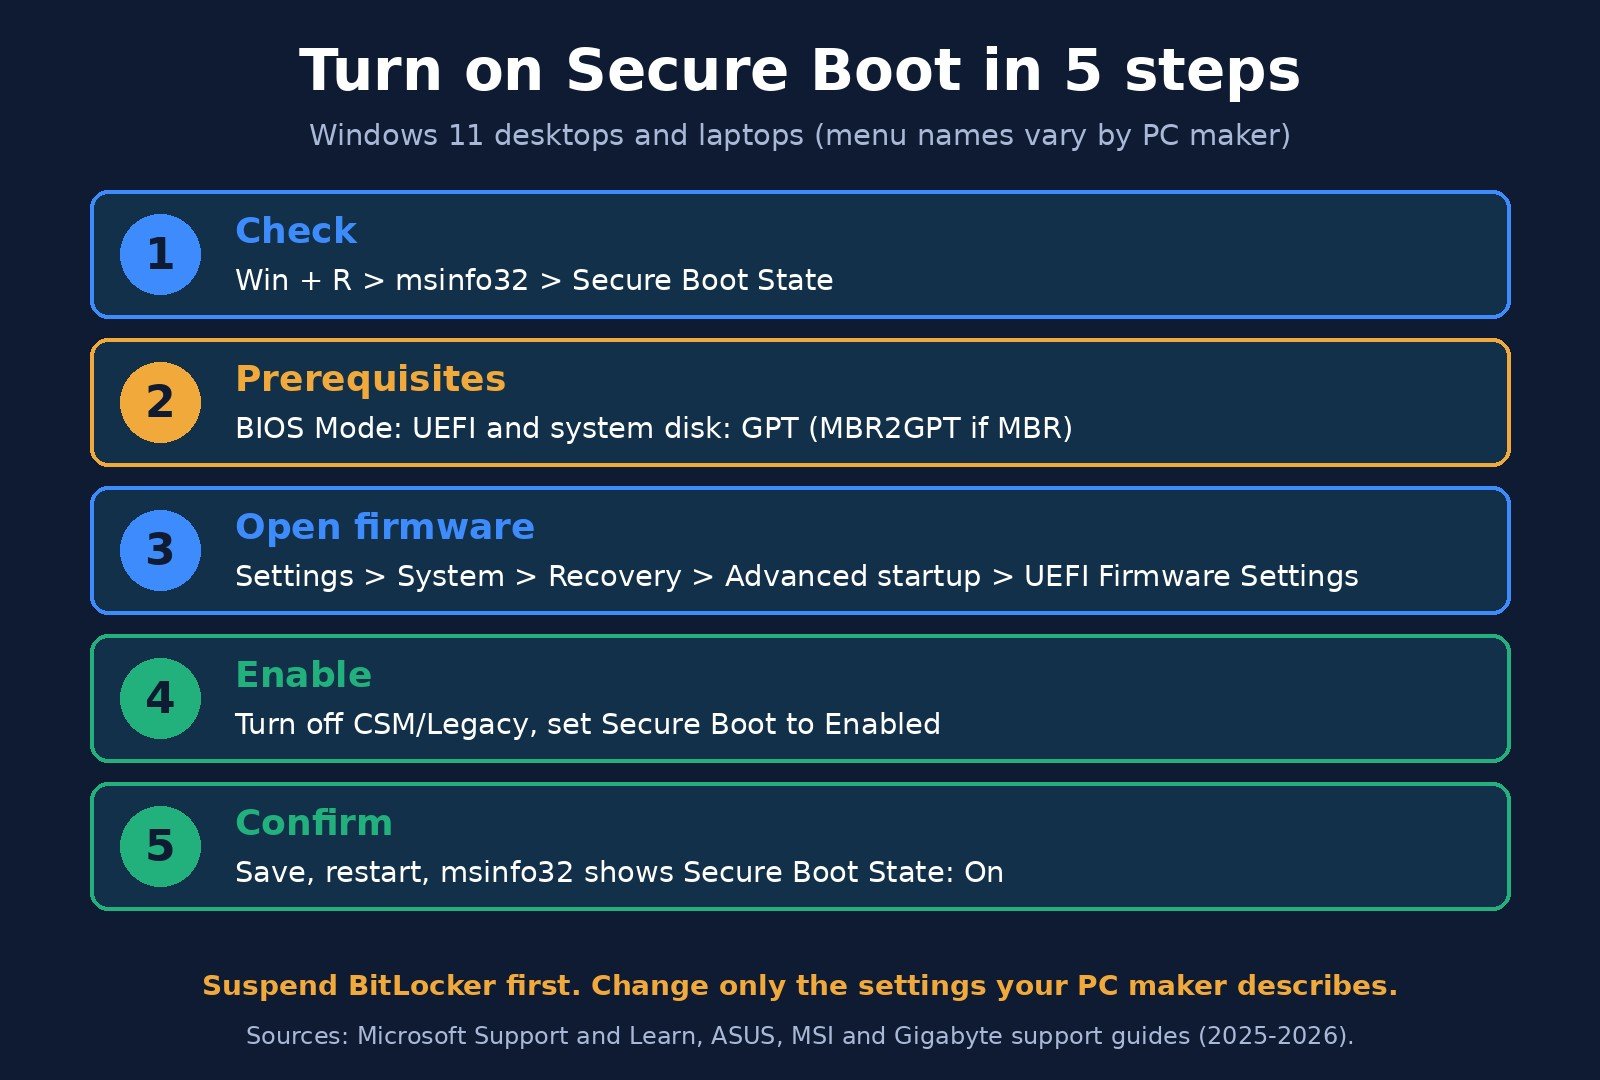
To enable Secure Boot on Windows 11, open Settings > System > Recovery, click Restart now next to Advanced startup, then choose Troubleshoot > Advanced options > UEFI Firmware Settings. In your PC’s firmware menu, make sure the boot mode is UEFI (not Legacy or CSM), set Secure Boot to Enabled, then save and restart. Before you do, check in Windows that your BIOS Mode already says UEFI and your system disk uses GPT, because switching on Secure Boot without those can stop Windows from starting.
Most PCs built for Windows 11 already support Secure Boot, and on many it’s switched on out of the box. When it isn’t, the cause is usually an older Legacy/CSM boot setup rather than missing hardware. This guide walks through checking your current state, fixing the two prerequisites, finding the right setting on ASUS, MSI, Gigabyte and Dell machines, and confirming it worked.
What Secure Boot does, and why games now ask for it
Secure Boot is a firmware feature that only lets trusted, digitally signed software load while your PC starts up. Microsoft describes it as a way to stop malicious software from loading before Windows does. That matters because malware that runs before the operating system (often called a bootkit or rootkit) is very hard for antivirus tools to see or remove.
Two things have pushed Secure Boot into the spotlight:
- Windows 11. To upgrade from Windows 10, Microsoft only requires that your PC be Secure Boot capable (running in UEFI mode), but it recommends turning the feature on for better security.
- Anti-cheat in games. MSI notes that Battlefield 6 and Call of Duty: Black Ops 7 require Secure Boot and TPM 2.0 to block low-level cheat software, and EA says some of its games need Secure Boot for its Javelin anti-cheat. If a game told you your system “does not meet security requirements,” this is usually why.
Step 1: Check if Secure Boot is already on
Don’t open the firmware menu until you know where you stand. The quickest check is System Information:
- Press Windows + R, type msinfo32 and press Enter.
- With System Summary selected, look at two lines on the right: BIOS Mode and Secure Boot State.
If Secure Boot State says On, you’re done; Secure Boot is already enabled. While you’re on this screen, the BIOS Version/Date line shows your current firmware version, which is useful if you need a BIOS update later.
You can also check from PowerShell. Right-click Start, choose Terminal (Admin), and run Confirm-SecureBootUEFI. According to Microsoft, it returns True if Secure Boot is on, False if the PC supports it but it’s off, and “Cmdlet not supported on this platform” on a PC booting in old BIOS (non-UEFI) mode. It must be run as administrator.
A third place to look is Windows Security > Device security > Secure Boot. Since April 2026, Microsoft says this page also shows whether your PC has received the updated Secure Boot certificates (more on that below).
What “Off” and “Unsupported” mean
- Secure Boot State: Off with BIOS Mode: UEFI is the easy case. Your PC supports Secure Boot and is set up correctly; the setting is just switched off. Skip to Step 4.
- Secure Boot State: Unsupported, usually with BIOS Mode: Legacy, means Windows is booting the old way, so Secure Boot can’t run. On most PCs from the last decade the hardware does support it; you need to fix the prerequisites in Steps 2 and 3. If you’re unsure, EA’s advice is to check your motherboard’s specification sheet or manual.
Step 2: Check the two prerequisites (UEFI mode and a GPT disk)
Secure Boot only works when the PC boots in UEFI mode, and UEFI mode needs the Windows disk to use the GPT partition style rather than the older MBR. MSI and Gigabyte both warn that forcing Secure Boot on without these can leave Windows unable to boot.
- BIOS Mode: you already saw it in msinfo32. It should say UEFI.
- Partition style: right-click Start and open Disk Management. Right-click the disk that holds C: (usually Disk 0, in the left-hand label), choose Properties, open the Volumes tab and read Partition style. You can also run
Get-Diskin PowerShell and check the Partition Style column, as Microsoft shows.
| What msinfo32 and Disk Management show | What it means | What to do |
|---|---|---|
| Secure Boot State: On | Already enabled | Nothing |
| BIOS Mode: UEFI, disk: GPT, Secure Boot: Off | Ready; setting is just off | Go to Step 4 |
| BIOS Mode: Legacy, disk: GPT | Firmware is in CSM/Legacy mode | Switch the firmware to UEFI and disable CSM in Step 5 |
| BIOS Mode: Legacy, disk: MBR | Old-style setup end to end | Convert the disk to GPT (Step 3), then switch firmware to UEFI |
| No Secure Boot option in firmware at all | Very old board or outdated firmware | Check your maker’s support page; a BIOS update may add it |
Step 3 (only if your disk is MBR): convert it to GPT
Windows includes a tool called MBR2GPT that converts the system disk from MBR to GPT, and Microsoft says it does this without modifying or deleting the data on the disk. It’s still a change to how your PC boots, so take these precautions first:
- Back up anything important. Both Gigabyte and MSI recommend it before changing these settings.
- Suspend BitLocker if it’s on. Microsoft lists changes to the disk’s partition table, the boot manager and firmware among the things that can trigger BitLocker recovery, and says suspending protection beforehand avoids that. Search Start for “Manage BitLocker” and choose Suspend protection, and make sure you know where your recovery key is. MBR2GPT also requires BitLocker to be suspended before it will convert an encrypted disk.
Then run the conversion:
- Search Start for cmd, right-click Command Prompt and choose Run as administrator.
- Run
mbr2gpt /validate /allowFullOS. This only checks whether the disk can be converted. If it fails, stop here and read the error; a common cause is having more than three partitions, which the tool doesn’t allow. - If validation succeeds, run
mbr2gpt /convert /allowFullOS. - When it reports “Conversion completed successfully,” don’t just restart and walk away. Microsoft says the firmware must now be switched to UEFI mode for the PC to boot, so go straight into the firmware (Step 4) and change the boot mode as described in Step 5.
Without a disk number, the tool converts the system disk. Microsoft’s own warning is worth repeating: the conversion can’t be undone once it starts.
Step 4: Get into the UEFI/BIOS settings on Windows 11
The method that works on almost any Windows 11 PC is the one Microsoft recommends:
- Save your work and open Settings > System > Recovery.
- Next to Advanced startup, click Restart now.
- On the blue screen, choose Troubleshoot > Advanced options > UEFI Firmware Settings, then click Restart.
Your PC restarts straight into its firmware menu. Alternatively, press the setup key as the PC powers on: it’s Delete on ASUS and Gigabyte desktop boards and F2 on Dell PCs. Other brands use different keys, so check your maker’s support page. The same Advanced startup screen is how you reach Safe Mode, covered in our guide to booting into Safe Mode on Windows 11.
If you don’t see a UEFI Firmware Settings tile, your PC is probably booting in Legacy mode. Use the power-on key instead.
Step 5: Turn on Secure Boot in the firmware
Every maker labels things differently, but the job is the same everywhere:
- Many desktop boards open in a simplified view. Switch to Advanced Mode if you see that option.
- Find the boot mode setting. If you see CSM (Compatibility Support Module) or Legacy, disable it or set the boot mode to UEFI. Microsoft says that if both UEFI and Legacy are offered, UEFI should be the first or only option.
- Find Secure Boot (usually under a Boot or Security tab) and set it to Enabled, or set the OS type to Windows UEFI mode.
- Save and exit (F10 on many boards), and confirm.
Microsoft’s own warning is to change only the Secure Boot settings your device maker describes, since other firmware changes can affect security or stop the PC from starting.
Where the setting lives on popular brands
| Brand | Setup key | Where to go | What to set |
|---|---|---|---|
| ASUS motherboards | Delete | Advanced Mode > Boot > Secure Boot | OS Type: Windows UEFI mode (the default “Other OS” leaves Secure Boot off) |
| MSI motherboards | Delete | Settings > Advanced > Windows OS Configuration | BIOS CSM/UEFI Mode: UEFI, then Secure Boot: Enabled; F10 to save |
| Gigabyte motherboards | Delete | Advanced Mode > Boot | CSM Support: Disabled; then Secure Boot > Secure Boot Mode: Custom and accept “Restore Factory Keys” |
| Dell laptops and desktops | F2 at the Dell logo | Secure Boot section | Secure Boot: Enabled, then Apply or Save and Exit |
| HP, Lenovo, Acer, ASRock and others | Varies | Follow your maker’s page linked from Microsoft’s Secure Boot guide | |
On MSI’s example board, the Secure Boot option only appears after you switch to UEFI mode, and Gigabyte says the same about disabling CSM. If you can’t see Secure Boot at first, the boot mode is the reason. Menu names can shift between firmware versions, so check your exact model’s manual if your screen looks different.
Many games that need Secure Boot also need TPM 2.0. It’s usually in the same firmware, labelled something like AMD fTPM, Intel PTT or Security Device Support. MSI says both are enabled by default on its newer AMD boards, so Windows 11 users on recent hardware usually don’t need to change anything.
Step 6: Confirm Secure Boot is on
Once Windows loads, open msinfo32 again. You want BIOS Mode: UEFI and Secure Boot State: On. If you suspended BitLocker in Step 3, go back to Manage BitLocker and choose Resume protection. EA notes that on some versions of Windows, one more restart may be needed for the feature to fully enable.
Troubleshooting common Secure Boot problems
The Secure Boot option is greyed out
This is usually because CSM/Legacy mode is still on, so switch to UEFI first. Some boards also tie the option to their Secure Boot keys: EA notes that some makers require you to reset the Secure Boot keys to factory values, or set a BIOS admin password, before the setting can be changed. On ASUS boards, the Secure Boot State field itself is always grey; you change OS Type instead.
Windows won’t boot after enabling Secure Boot
Go back into the firmware and undo the change. Gigabyte advises disabling Secure Boot or turning CSM back on to restore the previous state, then checking the disk partition style and boot mode before trying again. A failed boot is almost always an MBR disk or a Legacy-mode install, not damage. If Windows starts but hangs on the welcome screen afterwards, see our fixes for Windows 11 stuck on the welcome screen.
Windows asks for a BitLocker recovery key
Firmware and boot changes can trigger this if BitLocker wasn’t suspended first. Enter the 48-digit key. If it was backed up to your Microsoft account, you can find it by signing in at aka.ms/myrecoverykey from another device; Microsoft’s recovery key guide lists where else to look.
You dual-boot Linux
Some Linux distributions won’t boot with Secure Boot on. Tom’s Hardware’s advice is to check that your distro supports Secure Boot before relying on it.
The game still says Secure Boot is off
Restart once more, then confirm in msinfo32. If msinfo32 says On but the game disagrees, check that TPM 2.0 is enabled too (press Windows + R and run tpm.msc, which shows the TPM status) and that Windows and your firmware are up to date.
The 2026 Secure Boot certificate update: do you need to do anything?
Microsoft’s original Secure Boot certificates from 2011 began expiring in June 2026, and Microsoft is replacing them with a 2023 set. For most home PCs on a supported version of Windows, the new certificates arrive automatically through Windows Update. Some PCs also need a firmware update from the manufacturer first.
A PC that misses the update still starts and runs normally, according to Microsoft, but it stops receiving new security fixes for the early boot process. To check, go to Windows Security > Device security > Secure Boot. Microsoft says the fully updated message reads that all required certificate updates have been applied. If it says a firmware update is needed, get it from your PC or motherboard maker. Microsoft is clear that you shouldn’t disable Secure Boot to work around the expiry.
How to enable Secure Boot: frequently asked questions
How do I know if Secure Boot is enabled?
Press Windows + R, type msinfo32 and press Enter. In System Summary, the Secure Boot State line says On if it’s enabled, Off if it’s supported but switched off, and Unsupported if the PC is booting in Legacy mode. You can also run Confirm-SecureBootUEFI in an admin PowerShell window, which returns True when Secure Boot is on.
Can I enable Secure Boot without reinstalling Windows?
Yes, in most cases. If your BIOS Mode is already UEFI, you only need to switch Secure Boot on in the firmware. If Windows is installed on an MBR disk, Microsoft’s built-in MBR2GPT tool can convert it to GPT without deleting your files, after which you switch the firmware to UEFI and turn Secure Boot on.
Why does Secure Boot State say Unsupported?
Usually because Windows is booting in Legacy (CSM) mode rather than UEFI mode, which Secure Boot needs. Check that BIOS Mode in msinfo32 says UEFI and your system disk is GPT, then disable CSM in the firmware. If your firmware has no Secure Boot option at all, check your motherboard’s manual or support page.
Does Windows 11 require Secure Boot to be turned on?
To upgrade from Windows 10, Microsoft only requires the PC to be Secure Boot capable, meaning it runs in UEFI mode. Turning Secure Boot on is recommended for security, and some games with anti-cheat, such as Battlefield 6 and Call of Duty: Black Ops 7, require it to be on.
Is it safe to enable Secure Boot?
Yes, as long as your PC is in UEFI mode with a GPT system disk. If it is, enabling Secure Boot doesn’t touch your files or apps. If Windows fails to start afterwards, go back into the firmware and turn Secure Boot off or CSM back on, and the PC returns to how it was.
Will enabling Secure Boot delete my data?
No. Switching Secure Boot on only changes a firmware setting. Converting a disk from MBR to GPT with MBR2GPT is designed not to modify or delete data either, but because it changes how the PC boots, back up important files and suspend BitLocker first.
The bottom line
Enabling Secure Boot is a quick firmware change once the groundwork is right. Check msinfo32 first. If BIOS Mode says UEFI, restart into UEFI Firmware Settings, turn on Secure Boot, save and confirm. If it says Legacy, convert the disk to GPT if needed, switch the firmware to UEFI and disable CSM, then enable Secure Boot. Leave the other firmware settings alone, suspend BitLocker before boot changes, and keep Windows Update on so the 2026 certificate refresh reaches your PC. If you’re still choosing a Windows edition for a new build, our Windows 11 Home vs Pro comparison covers which security features, such as BitLocker, each edition includes, and our guide to checking CPU temperature is another useful health check while you’re in the firmware.

The Teck Hustlers Editorial Team covers technology, business, finance and gaming news for readers who want the story behind the headline. Every article is researched, written and edited by our in-house team, checked against company announcements, filings and reputable reporting, and updated when new facts emerge. We focus on what each development means for founders, professionals, investors and everyday users. Have a tip or a correction? Reach us through our contact page.