
Discover hassle-free ways to participate in airdrops effortlessly. Learn step-by-step methods for how to receive airdrops without complications. Uncover strategies to optimize your airdrop experience, ensuring you receive rewards hassle-free.
Are you eager to explore the world of airdrops and effortlessly receive them on your iPhone? Airdrops, a popular method of distributing tokens or files to various users, have become an exciting feature across different platforms. In this comprehensive guide, we’ll delve into the nuances of how to receive airdrops, particularly focusing on the seamless process for iPhone users.
From understanding what airdrops entail to step-by-step instructions on receiving them on your iPhone 13, this guide will equip you with the knowledge and skills to navigate this innovative technology effortlessly. Whether new to airdrops or seeking to enhance your understanding, this article will walk you through the ins and outs, ensuring you’re well-prepared to embrace this phenomenon and harness its benefits, especially when receiving airdrops on your iPhone.
What is airdrop?
Airdrop is an impressive feature available in your iPhone that facilitates the speedy sharing of files with other nearby iPhones, iPads, or Macs. It’s like a wizardry act where one can share pictures, videos, links, and more without needing a Wi-Fi connection or text messaging.
Simply tap a handful of buttons, and voila! Your belongings soar to your pal’s gadget in no time. It is similar to conveying messages in class but remarkably swifter and more fashionable.
To begin with, ensure that Bluetooth and Wi-Fi are activated on both devices. Afterward, access the file you wish to share and click on the share icon resembling a small box featuring an upward-pointing arrow followed by selecting Airdrop from available options. You will then see your friend’s device displayed on your screen; choose their name accordingly before sharing files quickly across iPhones through this convenient feature!
To use Airdrop, you need to be close to the person you want to share with. This feature is particularly convenient when internet speed is sluggish or Wi-Fi connectivity isn’t possible.
Always remember that Airdrop is great for sharing, but ensure you monitor those who can send files directly to you. For safety purposes, consider tweaking your settings only to accept documents from all or specific contacts; alternatively, opt out of receiving data entirely.
How to receive airdrop in iPhone?
Airdropping stuff on your iPhone is easy! It’s like sharing files or pics instantly with pals who are nearby. Here’s how to do it:
- Check your settings
- Locate the file or picture
- Choose your recipient
- Receive it!
- Where did it go?
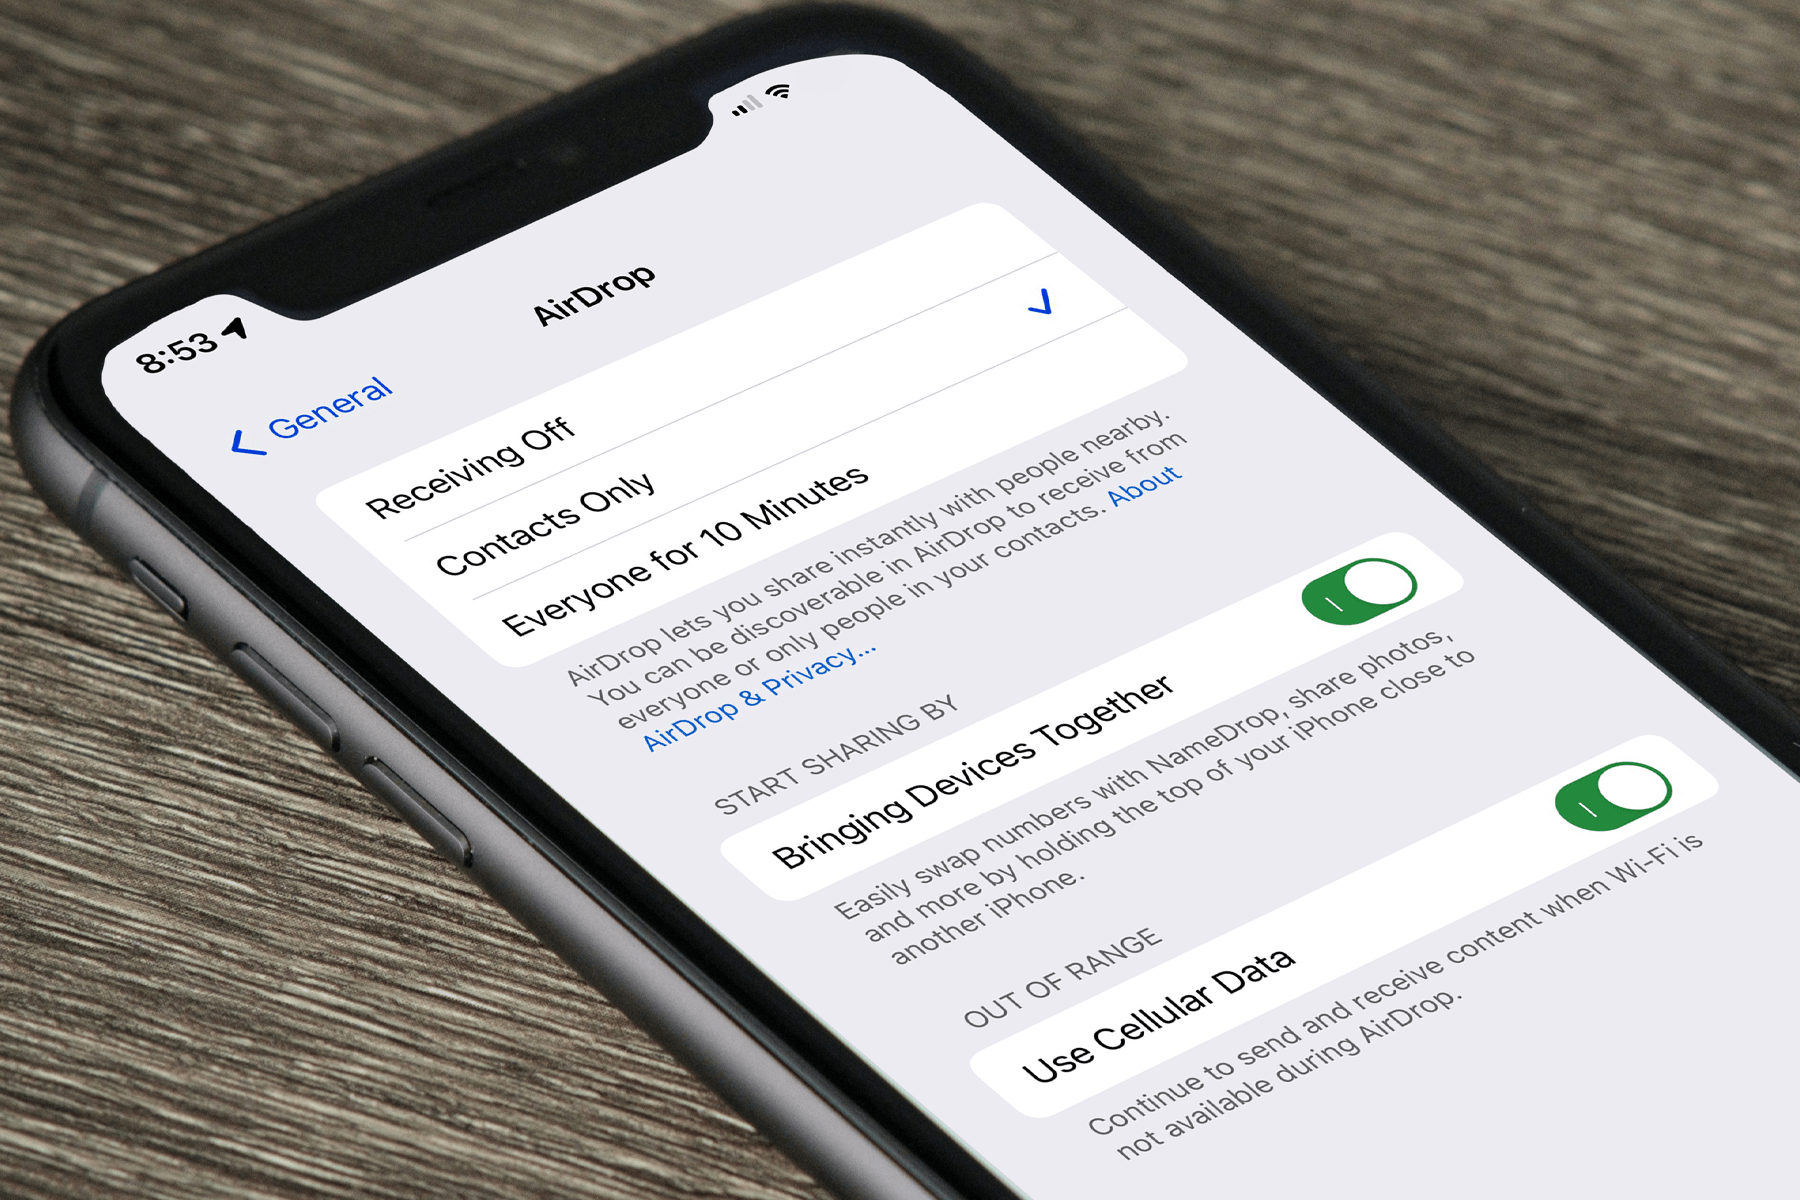
1. Check your settings
First off, make sure your Bluetooth and Wi-Fi are switched on. Then, tap on “Settings,” find “General,” and hit “AirDrop.” You’ll see options like “Receiving Off,” “Contacts Only,” or “Everyone.” Select “Contacts Only” if you wanna share only with your contacts or tap “Everyone” for, well, everyone nearby!
2. Locate the file or picture
Find the photo, link, or whatever you want to share. Tap the “Share” button (it looks like a box with an arrow) to bring up the sharing options.
3. Choose your recipient
You’ll see icons with nearby folks who have Airdrop enabled. Tap the person you want to send stuff to.
4. Receive it!
If someone’s sending something your way, a notification will pop up on your screen asking if you want to accept it. Tap “Accept,” and voila! You’ve got it!
5. Where did it go?
Check your “Downloads” folder or the app it’s related to. That’s where your airdropped treasure might be hiding!
And that’s the lowdown on Airdrop. Easy, right? Now go ahead and share stuff with your buddies hassle-free!
How to send an airdrop?
The process of sending an airdrop is effortless! Begin by ensuring that your device’s Wi-Fi and Bluetooth are operating. Following that, access the file or item you’d want to share. Locate and select “Share” or “Send,” which can frequently be recognized as an arrow pointing up or out icon option.
Afterward, opt for the “Airdrop” alternative from the on-screen menu. An inventory of available devices with enabled Airdrop will be displayed. Select your preferred person or gadget to transfer the file over to them.
If your file’s intended recipient is not listed, ensure that their device can be detected. They could adjust their Airdrop preferences to either “Everyone” or “Contacts Only” to receive it.
After choosing the recipient, click “Send” or “Share”. The file will be transferred through Bluetooth and Wi-Fi without cables. A notification alert will appear once the transfer is successfully done.
Don’t forget to turn on Airdrop on both devices and keep them close enough to one another for successful transfer. Congrats! You’ve completed an airdrop with ease.
How to receive airdrop on iPhone 13?
Follow these simple steps to receive an airdrop on your iPhone 13:
- To enable Bluetooth and Wi-Fi
- To enable airdrop
- Sharing
- Opt for airdrop
- Receiving
- Ensure your downloads
1. To enable Bluetooth and Wi-Fi
Either swipe down from the top right corner of your screen or navigate to Settings. Airdrop requires both features to function properly.
2. To enable airdrop
Swipe down from the top right (or up from the bottom for older iPhone models) to access Control Center. Next, press and hold on to the network settings box, then select “Airdrop” and choose either “Everyone” or “Contacts Only,” depending on who you want to receive files from.
3. Sharing
Locate the desired photo, video, or document to begin sharing a file. Select it and tap the share icon (often depicted as a box with an arrow).
4. Opt for airdrop
Locate the icon that denotes Airdrop in various sharing choices and give it a tap. Your iPhone will initiate its scan for devices located in close proximity.
5. Receiving
To receive a file via Airdrop, you will be notified when someone sends it. Simply tap “Accept,” if the sender is one of your contacts, the file will automatically download to your device.
6. Ensure your downloads
Files incompatible with your iPhone will be saved to the Downloads directory. Access the Files application and inspect this folder for such files.
You’ve done it! Your iPhone 13 is now ready to receive Airdrops with no fuss.
How do I accept airdrop?
Airdrops are cool freebies in the crypto world. So, how do you grab them? Here’s the lowdown.
- Check your wallet
- Stay updated
- Follow instructions
- Use trustworthy sources
- Be patient
- Gas fees
- Confirm reception
1. Check your wallet
Ensure your wallet supports the token being airdropped. If it’s compatible, you’re good to go.
2. Stay updated
Keep an eye on official announcements or social media posts. Sometimes, projects drop hints or instructions about airdrops.
3. Follow instructions
If you receive an airdrop notification, follow the steps outlined. It might involve joining a Telegram group, filling out a form, or just holding a specific token.
4. Use trustworthy sources
Avoid falling for scams. Stick to official channels or websites provided by the project. Double-check URLs to avoid phishing attempts.
5. Be patient
Airdrops might take time. Don’t panic if you don’t see tokens in your wallet immediately. Sometimes, it takes a while to process.
6. Gas fees
Depending on the blockchain, you might need to pay a small fee to claim your airdrop. It’s normal and usually a tiny amount.
7. Confirm reception
After following the steps, check your wallet. The airdropped tokens should appear in your balance.
Remember, airdrops can be sporadic, and not all projects do them. But when they happen, it’s a sweet little surprise in your wallet!
How do you receive airdrop on a phone other than an iPhone?
Are you interested in participating in airdrops but do not own an iPhone? No problem! Regardless of whether you use an Android or another non-iOS device, it is still possible for you to enjoy the benefits. The following instructions will show how:
One way to share files effortlessly across devices is by using file-sharing apps such as Zapya, ShareMe, or Files provided by Google. With these applications, you must choose the desired files and locate nearby gadgets for distribution. Android users can compare it with Apple’s AirDrop service!
Certain Android phones are equipped with Near Field Communication (NFC), which permits easy file sharing by placing your device near another NFC-compatible phone. Access your phone’s settings, activate the NFC option, and touch it to the other gadget to share files seamlessly.
Bluetooth transfer may not be as swift as Airdrop, but it is efficient. By activating Bluetooth on both gadgets and syncing them up, files can easily be transmitted from one device to another.
Consider using third-party applications such as ShareIt or Xender that are compatible with various platforms. These tools allow wirelessly transferring files between different devices, including Android and iOS.
You can store your files in cloud services such as Google Drive, Dropbox, or OneDrive and distribute them by sharing the link with those who need access.
After learning the process, feel free to begin effortlessly sharing files on your device that is not an iPhone.
How to receive airdrop on Mac?
If you want to know how to receive Airdrop on your Mac, here’s what you need to do: Utilize the wireless sharing feature of Airdrop available on your MacBook. This enables easy file transfer between Apple devices such as iPhones, iPads, or additional Mac computers that are located in close proximity. Just adhere to these straightforward instructions and start receiving files straight away!
To activate Airdrop on your Mac, click the Finder icon in your dock. Next, select “Go” from the menu bar within the opened window and opt for “Airdrop.” You may use the Command + Shift + R keys to achieve this task. Having Bluetooth and Wi-Fi enabled is crucial before proceeding with any transfers.
Modify your Airdrop preferences by selecting to receive files only from contacts or anyone. Choose your preference by clicking “Allow me to be discovered by.”
A notification will appear on your Mac if someone wants to send you a file via Airdrop. Simply click “Accept” to receive the file, and if it’s an image or document, it will open automatically in the correct app.
Where files are saved: The default location for received files is the Downloads folder. Nevertheless, you can save them in an alternative destination if that suits your needs better.
To prevent possible security hazards, it is advisable to exercise caution and exclusively receive Airdrop files from trustworthy individuals.
Receiving files through Airdrop on your Mac and sharing content with nearby Apple devices can be a breeze if you follow these simple steps.
How to receive airdrop on Android?
Wondering how to get an airdrop on your Android device? It’s actually quite simple! Follow these steps:
To begin with, ensure that your Android gadget is current by updating it. Navigate to Settings > System > Software Update and check for available updates.
To use Airdrop, enable Bluetooth and Wi-Fi by accessing the icons in the top area of your screen. Swipe down from the top portion of your device and click on each icon separately before proceeding with this feature.
Access the Settings menu and navigate to Connections. From there, select More Connection Settings, followed by Nearby Share.
To customize your Airdrop preferences, tap on the Nearby Share option. From here, you can select who can send you files (only contacts or everyone in proximity) and determine which Google account will be utilized for this feature.
Upon receiving a request to send something, you will receive a notification. Simply tap “Accept” in order for the file to be transferred successfully through the Airdrop feature.
After the transfer is complete, verify your file manager or associated app to gain access to any received files.
Keep in mind that airdrop functions differently on Android compared to Apple devices. However, with Nearby Share, sharing files is hassle-free for Android users. Start sharing now!
How to get airdrop on Binance?
Getting airdrops on Binance is pretty straightforward.
- First things first, make sure you have a Binance account. Once that’s sorted, watch for announcements or notifications from Binance about airdrops. These could pop up for reasons like new token launches, promotions, or community giveaways.
- Sometimes, participating in certain activities or holding specific cryptocurrencies might qualify you for an airdrop. Check out Binance’s official announcements, blog posts, or social media channels for any details or requirements to qualify for an airdrop.
- Another way to snag those airdrops is by staying active on Binance Launchpad. When new projects get launched, they sometimes airdrop tokens to users who meet specific criteria, like holding a certain amount of tokens or participating in related activities.
- Remember to keep your eyes peeled for any specific instructions. Binance usually provides clear steps on how to claim your airdrop. It could involve simple tasks like clicking a button or confirming participation through a specific link.
- Lastly, keep your account updated and verified. Sometimes, missing out on an airdrop could be as simple as not having your account verified or updated with the latest information.
So, stay tuned, stay active, and keep your account in good shape to catch those airdrops on Binance!
How to receive an airdrop on iPhone from everyone?
If you want to receive an Airdrop on your iPhone from anyone nearby, simply follow these simple instructions:
- To activate Airdrop, access the Control Center by swiping down from the top right corner of your iPhone screen. Press and hold onto both icons for Wi-Fi and Bluetooth simultaneously. Tap on “Airdrop,” then select “Everyone” to enable receiving items from any nearby individuals.
- Ensure Your iPhone is Visible to Others: Navigate to Settings > General > Airdrop and select the “Everyone” option. This will allow anyone in your proximity to locate your phone easily.
- If someone shares something with you through Airdrop, a notification will appear on your iPhone. To receive the content, simply tap “Accept”. However, ensure that Wi-Fi and Bluetooth are enabled for Airdrop to function properly.
- Please review your Airdrop Folder: Launch the Files app and select “Browse.” The Airdrop folder should be available. All of your received files will be accessible within it.
- If Airdrop fails, troubleshoot by verifying that Bluetooth and Wi-Fi are both activated. Additionally, confirm that the sender is in close proximity and has set their Airdrop to “Everyone.”
- Remember to change your Airdrop settings back to “Contacts Only” after you finish receiving from others since privacy is important.
Don’t forget that Airdrop is a nifty method to swiftly exchange various types of files, such as pictures, clips, web links, and other content. Simply leave it on and prepare to receive extraordinary items from individuals in your immediate vicinity!
How to receive airdrop on a trust wallet?
It’s easy to receive an airdrop using Trust Wallet. Just download and set up the app on your mobile device first. Then watch for token giveaways from cryptocurrency organizations or projects – that’s basically what an airdrop is all about!
When you stumble upon an airdrop, certain steps are mandatory to claim it. Adding the token manually into your wallet is generally required. This process is fairly easy and uncomplicated – just select “Add Custom Token” and enter essential details like decimals offered by the project and its contract address, among others.
Your wallet may not display the added token immediately. The appearance of tokens can be instant or delayed, thus requiring patience in such instances.
Be cautious, as fraudulent activities exist aiming to deceive you. Stay alert and wary of schemes asking for your private keys or personal information while claiming an airdrop. Genuine airdrops never necessitate such data from you.
That’s the whole process! Keep yourself informed of airdrop notifications, add the tokens to your Trust Wallet and hey presto! You now own free available tokens.
What can be sent on airdrop?
AirDrop allows you to zap stuff between Apple devices lightning-fast. So, what stuff can you sling using this magic? Well, pretty much anything you’d want to share quickly!
- Photos? Yup, toss them over. Snazzy videos? Sure thing! Contacts? Absolutely. Websites, locations, documents, and even app info? Absolutely! AirDrop is your go-to for sending these goodies without breaking a sweat.
- Do some fancy PDFs or presentations? AirDrop’s got your back. Need to share your latest jam or audiobook? It’s a piece of cake! Plus, you can even sling full app data between devices. Cool, right?
- AirDrop works wonders for most file types, but size limits exist. While smaller files whisk through in a flash, larger ones might take longer. So, for those hefty videos or huge documents, patience is key.
- One last thing: AirDrop’s a champ within the Apple ecosystem. So, if you’re crossing into the Android world or other non-Apple devices, you might need a different trick up your sleeve. But for iPhones, iPads, and Macs? AirDrop’s the ace up your sleeve!
Why should you consider using airdrop and its advantages?
AirDrop is an extremely convenient feature that simplifies the sharing of files between Apple devices. Discover why you should definitely embrace its usefulness:
- AirDrop enables instantaneous sharing of photos, videos, contacts, and other content without delays or sluggish transfers. It’s essentially like a supernatural act; one moment, it isn’t shared, and the next instant – poof! It’s done!
- Forget Cables and Dongles: AirDrop eliminates the hassle of cables and tangled wires. You only need your Apple device and a simple tap to enjoy its wireless convenience effortlessly.
- Privacy is crucial as AirDrop allows you to have complete control over the sharing of your data. You can share it with everyone in close proximity or only specific individuals, giving you ultimate decision-making power.
- AirDrop is compatible with all your Apple devices, including the iPhone, iPad, and Mac. It doesn’t matter which device you’re using – AirDrop will work seamlessly across them all.
- AirDrop doesn’t require the Internet: Yes, indeed! AirDrop can still function without Wi-Fi or data, making it an ideal tool for sharing material in areas with unreliable connections.
- Setting up AirDrop is incredibly easy. All you need to do is tap a few times, and voila! No technical knowledge is required whatsoever.
Sharing content across Apple devices has been made excessively easy with the help of AirDrop. Therefore, whenever you need to share anything instantly, try out AirDrop!
FAQs
- What is an airdrop on a phone?
An airdrop on the phone refers to receiving free tokens or cryptocurrencies directly into a digital wallet.
- How do I receive an airdrop on my phone?
To receive an airdrop on your phone, you typically need a compatible wallet app and should follow the instructions provided by the airdrop project.
- Do I need a specific type of phone to receive airdrops?
No, airdrops are not limited to a specific type of phone. You can receive airdrops if your phone can run compatible wallet apps.